
This posting contains the instructions for assembling the kit "Dovecote". The pieces in your kit may vary in color from the photo above.
I recommend you look through all of the instructions before starting the assembly. Then go back and follow them step by step. I have provided lots of photos to help you understand the steps as most of us are visual learners.
Photos can be enlarged by clicking on them.
This is a precision cut kit. There is no need for scoring the bend lines as they are perforated. Only bend parts when instructed to do so. Never play around with bending the parts on the kit to see how it is going to look as they are somewhat fragile. You will be reinforcing these bend lines as part of the assembly process.
Be stingy with the glue, excess glue on the project will make a mess of it. This kit is made with coated paper, a slightly damp paper towel will remove excess glue spots if you get to it right away. Keep your fingers free of glue at all times, use tweezers.
Please refer to the posting on this blog http://glitterhouses.blogspot.com/2014/03/tips-for-folding-tiny-pieces.html for extra advice on making and handling the folds on some of the very small pieces. eyAs all the fold lines have been perforated tht are easy to bend but very small pieces do best with a bit of assistance from tweezers and such.
Please refer to the posting on this blog http://glitterhouses.blogspot.com/2014/03/tips-for-folding-tiny-pieces.html for extra advice on making and handling the folds on some of the very small pieces. eyAs all the fold lines have been perforated tht are easy to bend but very small pieces do best with a bit of assistance from tweezers and such.
----------------------------------------------------------------------------------------------------------

Your kit should contain the parts as shown in this photo. Some kits will have other color choices but the shapes are the same. If you purchased the kit in December of 2017 or later the pieces are packaged differently.
You will use the craft knife to remove the small "sprues" that hold the piece into the carrier sheets. To get a good flush trim hold the beveled cutting edge of the knife so that it is parallel to the paper's edge. We usually hold knives with the main part of the blade parallel to the cut but it won't trim the edges flush if you hold your knife in that position.
----------------------------------------------------------------------------------------------------------

The Tools you will need are a micro tipped applicator for the glue. A sharp craft knife for cutting the parts out of the carrier sheet and a pair of tweezers and scissors. Also have on hand a slightly damp paper towel to remove any excess glue and for keeping your fingers clean of glue.
Most glues will not adhere to the acetate windows. Use Crafter's Pick "The Ultimate" or rubber fortified super glue that is made for plastic or cellophane tape.
Paper parts can be glued with "The Ultimate" or a PVA glue such as Elmers. These glues dry quickly which speeds up your assembly time. Clear glue products such as Elmers school glue may dry too slowly for assembly purposes.
-----------------------------------------------------------------------------------------------------------

Glue the acetate windows and the door in position.
The door is the smallest part on the sheet with the main roof and the dormer roof.
Most glues will not adhere to the plastic windows. Use Crafter's Pick "The Ultimate" or rubber fortified super glue that is made for plastic or cellophane tape.
Trim the windows to the outside black line. The side of the window with raised printed lines should face to the outside of the Dovecote.
Put the glue on the walls, not on the windows. Work on one window at a time as the glue dries very quickly. Always use tweezers to hold the windows. You must work quickly as you will only have a very short time in which you can adjust the position of the window. Check the window position by looking at the other side of the sheet and reposition if needed by using tweezers to push against the edge of the plastic.

Make a 90 degree bend in the "wall splice" and glue one side of the bend to the end of the first floor wall sections. The wall splice is located on the same side of the wall where you glued the windows and door.
Make sure the splice is flush to the edge of the wall. This is easy to do if you place the wall edge against the table top while installing the splice.
-------------------------------------------------------------------------------------------------------------

Bend the wall sections to form hexagons. Glue the other end of the wall sections to the wall splice creating a flush butt join, not an overlap.
-------------------------------------------------------------------------------------------------------------

Slide the hexagons with slots over the tabs at the top of the walls. Place adhesive under the tabs and bend them down to secure.

-------------------------------------------------------------------------------------------------------------

-------------------------------------------------------------------------------------------------------------

Apply a very small bead of adhesive to one side of

the timber trim piece running the bead over all the sections of timber. Don't worry about a continuous line of glue small gaps are not a problem. Be skimpy with the glue you don't want excess glue coming out from under the timbers. Do not get glue on the overhanging areas as other pieces will be attaching to that edge in later steps. Look at the photo below to better see the overhanging area.
Use the tweezer to press the timbers against the walls to secure them in place.
Install the door first so you don't put it in the wrong place or put the windows over the door opening!


------------------------------------------------------------------------------------------------------------

Look closely at this photo. Note that because the laser actually makes a tapered cut the perforations are larger on one side of a piece than the other.
The small perforations will face to the outside of the building, the large perforations will be on the inside. Don't panic if you get it backwards, it will still look good, don't try and fix it as you might break the perforations


Use your tweezer to hold the parts and push the piece against the overhanging edge of the hexagon then lower into position. Use the tweezers to press these pieces against the walls to secure them.
-------------------------------------------------------------------------------------------------------------

As shown in the photo run a bead of glue against the bottom of the wall of the upper story.

Let the parts sit for a few minutes until the glue dries.

-------------------------------------------------------------------------------------------------------------

Run a thin bead of glue against lower edge of first story walls.

Place the hexagon inside the edge of the wall trims resting it on the edge of the first story walls.
-----------------------------------------------------------------------------------------------------------

------------------------------------------------------------------------------------------------------------

Place glue under the two side wall tabs. Do not bend or glue the lower tab.
-------------------------------------------------------------------------------------------------------------

Place glue on the upper edges of the dormer and put the dormer roof into position. Hold it in place with your fingers for a minute or so until the glue grabs.
-------------------------------------------------------------------------------------------------------------

Look carefully at the trim that goes against the dormer wall. The lower edge of the triangle has a straight edge, the two upper sides have a slight arc.
Glue and press against the dormer wall to secure.

----------------------------------------------------------------------------------------------------------

Install the roof splice by folding it and gluing into place flush with the edge of one wall. (See the wall splice instructions above). Position the splice towards the top of the roof so that it won't sit directly under the edge of the building's walls.
Fold the roof sections to form the roof. Glue the second half of the roof splice to secure the sides.
Run a thin bead of glue up all the joints on the inside of the roof to strengthen it.

Place the roof onto the structure and check to see that it is level and evenly seated around all the sides.
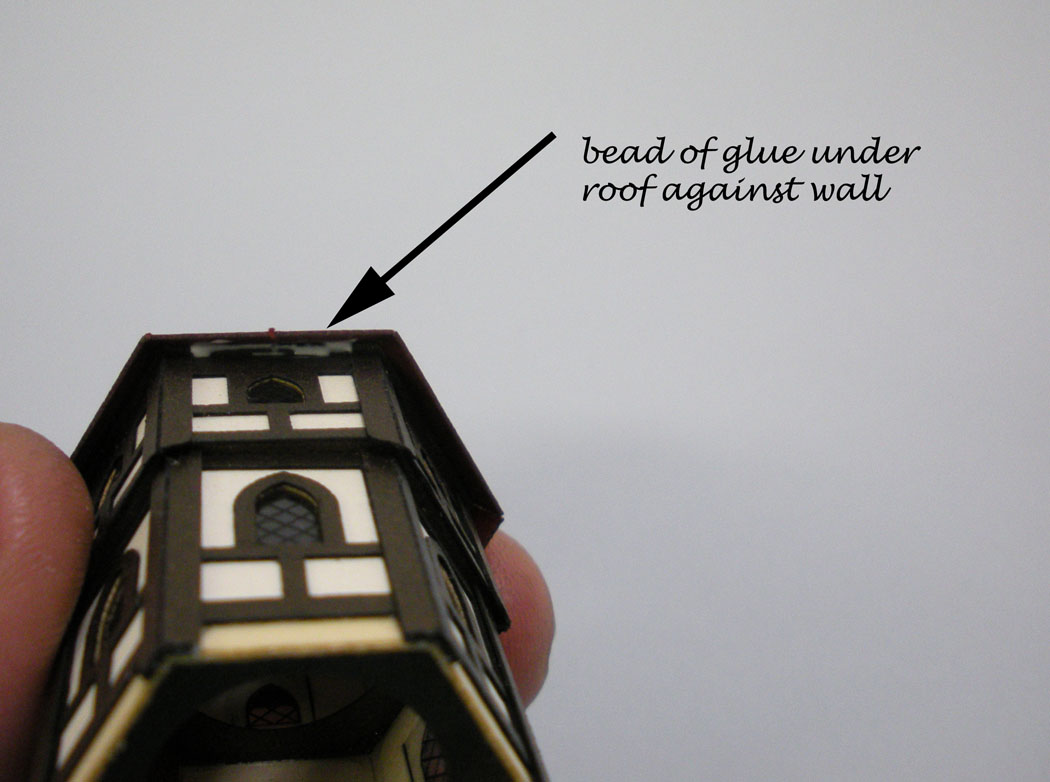
------------------------------------------------------------------------------------------------------------

If you are going to glitter the structure do so before you glue the tree in position.
Glitter instructions are provided in a separate posting on this blog.
I hope you had a great time building your Dovecote kit.